Showing posts with label recycle. Show all posts

Monday, August 3, 2015

Scrap Happy

August 2015
Sheree McKee
sewfabsew.blogspot.com

Scrap Happy!  

I treasure my leftover scraps from making fiber postcards.  I save them in three ways: Fabric with Fusible, Fabric attached to Stabilizer, Scrap-ola

A.  Fabrics with Fusible

Fabrics with fusible already bonded to their reverse side, are ready-to-go.  They can speed up your next project because it's as simple as cutting a shape and fusing it within your postcard design.

After each postcard project, I carefully inspect my leftover pieces by looking for the shiney fusible layer, and I keep the pieces with paper backing on their reverse side.  

These can be small or large scraps, but I save the best of them.  I like to store them in a  gallon size zip-lock bag for easy viewing, shaking, and sorting.  


With fusible attached, these are perfect for fussy-cutting

B.  Fabrics attached to Stabilizer

There was a time when I used to toss away the leftover fabrics attached to stiffeners.  I never imagined I could use these thick scraps for anything worthwhile.  Most of them tended to be narrow, stiff sliver shapes.  But I was wrong!  

Fabrics attached to stabilizers, can add a dimensional layer to your postcard projects.  Imagine layering them as a post on a birdhouse design, a branch on a tree, or cutting out modern geometric shapes.  The ideas are endless!

You can fuse them down, or use your favorite decorative stitches to attach each piece. 

I have even bridge-stitched them together using decorative machine stitches to adjoin the pieces side-by-side.  This makes a whole new patchwork postcard, ready for attaching additional embellishments!


Thin slivers can be adjoined to make enough for a whole postcard

C.  Scrap-ola

That's what I call my scraps.  I think we all save our fabric fragments.  But what size is a true scrap?  Of course, that's a personal decision! 

If my leftover fabric piece is larger than 10"x10" I fold it back into the main yardage and store it away with my fabric collection.  

But if it falls into my definition of SCRAP-OLA (under 10"x10") I like to tuck them into color-coordinated, recycled tissue boxes.

It sure makes great sense, to recycle and repurpose both the pretty tissue boxes and the fabric scrap-ola!


I match my scraps to the color of the box!
This crate holds two layers of stacked scrap-ola boxes
Scrap-ola on its journey to a new postcard!

My final postcard made from recycled Scrap-ola

Monday, January 5, 2015

Holiday Recycling

Holiday Recycling for winter fun!

Sheree McKee
sewfabsew.blogspot.com
January 2015


With the holidays past us, sometimes we need a winter project to fill the time until spring.  Christmas probably offers the biggest selection of cool textural "stuff" to revamp.  

Just what do you plan to recycle?  There is an unlimited possibility when your imagination is revved up!   This could be your chance to turn some trash into treasure…. or NOT!
Woven background uses coffee bags

Have you found yourself saving any of the items listed below?

Holiday advertising mail or catalogs
Baubles, Beads, Buttons
Broken ornaments or jewelry
Candle waxes
Candy wrappers
Christmas Cards
Foils: Coffee or Cookie bags
Holiday napkins
Holiday Stickers
Pinecones
Postal Stamps
Ribbon or cording
Silk flowers
Tapes: Duct, Washi etc.,
Tinsel or Trim
Tissue or Wrapping paper
Wine corks
Stuff to recycle
Colorful coffee bags
Since fiber postcards are the subject of this blog, most items will need to be flattened or cut into smaller sizes.  Keep in mind, the more dimensional your postcard surface is... the more postage and special handling it will require.

You will also want to incorporate some amount of fabric or textile to keep with the theme of “fiber postcards”.  

This year, I decided to re-purpose colorful coffee bags, they are much too pretty to toss out!  My thoughts were geared towards weaving the metallic strips of bag together with fabric and leftover ribbon or cords to form a base fabric.

I’m not too happy with the end results.... and I'll share why.  But at least I gave it a try.  The coffee bags appeared to be foil-like.  In my first attempt, I cut random width strips and left the top edge intact.  On a tabletop, I taped down the upper edge then flat-wove other items through the metallic strips.  The results were a simple 13"x13" fiber weaving.  


In my first version, I cut sides open to lay flat
I used scallop rotary cutter and left top edge intact
But those bags had a mind of their own!  They had curves and folds from being shaped like a coffee bag.  My brain said "Let's iron my new woven fabric flat."  I used a non-stick pressing sheet for protection.  Unfortunately, I discovered the coffee bags were made of 
a heat-sensitive thermoplastic, not a foil at all.  The strips twisted and torqued every which-way and all the woven ribbons, fabric, etc., popped out.  I was forced to reweave, then chose to lightly fuse an iron-on interfacing to the back to hold everything together.
Interfacing on back


Woven but distorted

The second attempt was more successful.   This time I used a straight rotary blade and cut complete strips from the coffee bag.  Then I used duct tape to secure the top edge and used clear packing tape on the backs after weaving a few rows. 

My second coffee bag
Eventually, it was time to stitch through the layers and hold everything together.  My first version was easy to stitch because it had an interfacing backing.  My second attempt was more challenging due to clear packing tape adhering the back together.  This tape gummed up my needle a few times, and resulted in a some skipped stitches.


Decorative stitching to hold the weave together


Finally it was time to cut apart my mini masterpieces (joke).  Below, you can see a window template (made from cardstock) that I use to audition the best cutting location for postcards.   After careful planning, I was able to get two postcards from each woven coffee bag.


I must admit, this was a lot of work to produce a background fabric.  Many times my ideas don't quite work the way I plan!  

The start of four postcards
In the first photos, you can see I chose to sew a fabric yo-yo and holly leaf on my project.  But another idea I plan to play around with will use sparkly motifs cut from Christmas cards. I'll keep you updated with additions to this article.  Have fun with your recycling and designing!

Sparkly embellishment designs from fronts of holiday cards
Here is the backside with fabric backing and iron-on binding


Wednesday, January 29, 2014

Pretty little Postcards ~ in fabric


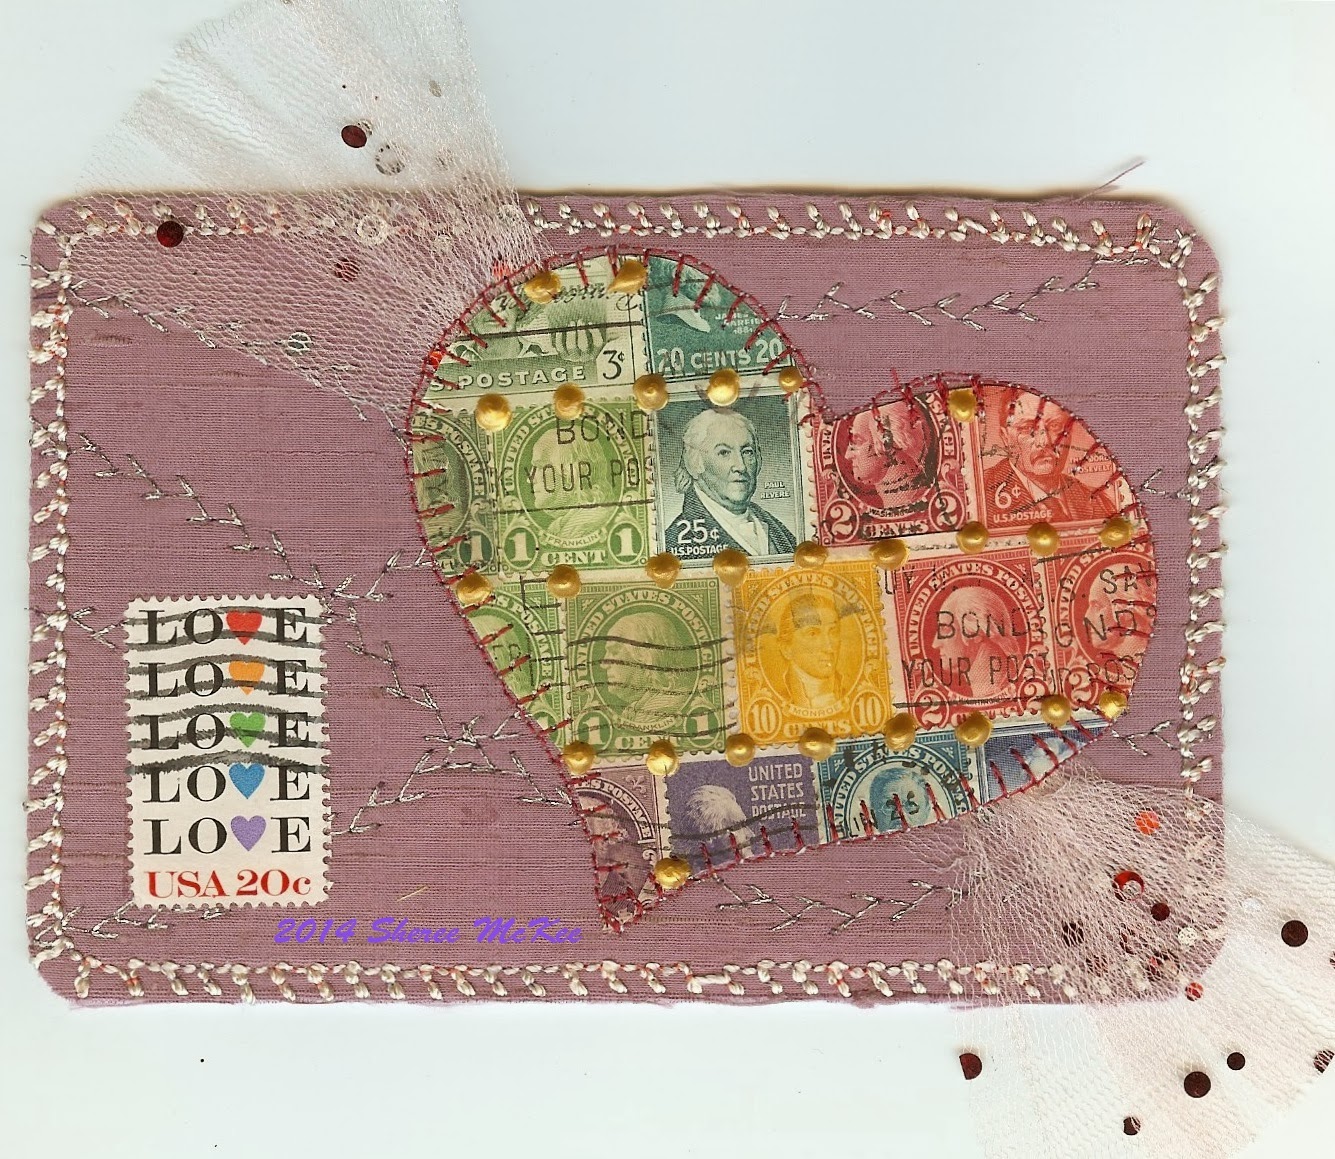
Love stamp in reds, on silk dupioni
Love Stamp and rainbow colors
I added metallic decorative stitches in the background
Celebrate stamp was sent as a
birthday postcard to a friend
Postcards are 4"x6" even with this tail
it will still fit into a clear envelope

January 2014
Sheree McKee
sewfabsew.blogspot.com


Welcome !  This is my new blog, dedicated to a current obsession with fabric postcards.

Here are some recent creations I made to exchange with members of an online swap group.  Our theme was Every Stamp Tells a Story.

Dimensional fabric paint looks like metal rivets

I confiscated an old box of mixed stamps from my sons closet. He never really got interested in stamp collecting.  I figured recycling the postal treasures would make great sense
for this sewing project.


I began by selecting a story stamp, such as birds, love, flowers.  Then I took random portrait stamps and created a "stamp fabric" with them.  I  layered them onto the back sticky side of heavy duty, clear packing tape. Then I cut out a motif shape.


My first "stamp fabric" was attached to duct tape, but warning.... stitching through it gummed up my machine needle!  However, the clear packing tape was much cleaner to sew through.

The dimensional paint dabs (rivets) have a reason.  They hold down the intersection of stamps.  Some of the older stamps wanted to curl away from my tape.  Next time I will gently iron them flat before adhering.


It's rare that I ever make two identical postcards.  I like to experiment with changes in the background fabrics and edge finishes.  If you don't have old postal stamps, you could use a variety of stickers for this method.


Fabric postcards can be flat or embellished. They are often a collage of fabrics, trims, and other tidbits. The more dimensional you make your postcard, the more you'll pay for special postage rates to mail it.  I mailed some of these in clear cellophane envelopes.


Uncle Sam might be proud of my stamp recycling techniques. Or, as my sister stated, I could have just ruined a "really valuable" vintage stamp somewhere in these postcards.  Oops!


Thanks for stopping by.....

ShereeSews in M!ch!gan


                                                                                      A little glitter tulle and feathers add spark!


stitch by stitch