Thursday, December 31, 2015

Radius Shaped Corners on Fabric Postcards

December 2015
Sheree McKee
sewfabsew.blogspot.com


Redwork by MaryLou Curry

Who says a postcard MUST have square corners?  Well, they don't have too.   

Radius-shaped corners add a modern touch to your postcards.  This sleek shape is clean looking. The soft curves are easy to overcast and sew, and you don't need any special tools.


SIX EASY TIPS:


  1. Create your postcard as usual with all three layers:  front, filler, backing.  Take care to keep embellishments a good distance away from the four corners
  2. Use a small jar, cookie cutter, soda cap or any suitable object as a guide to gently mark the curved corner shapes.  
  3. Trim carefully with scissors.  
  4. Select a favorite overcast stitch, bias trim, rick rack or cording to finish the radius corners.
  5. Stitch slowly when working your way around the curved areas.  Sometimes it helps to shorten your stitch length at the most curvey corners, then return to normal stitch length on the straight sides.  When you shorten the stitch length it gives better thread coverage and prevents thread gaps.
  6. I suggest you make a sample curve when attaching any trims to the edges.  This will help you get the machine settings correct, and give you a better understanding of how those trims will behave when stitching around the radius.
Use an object to guide your radius shape

Trim curves carefully

I happen to adore the look of radius corners, but apparently many of my swapping partners do not.  

When I flipped through my collection of almost 500 swapped postcards, only one swap partner, MaryLou Curry of Toronto, Ontario Canada frequently enjoyed using this same method on some of her postcards.  Thanks MaryLou!  I have posted some of her creations for you to enjoy!

I hope you will give Radius-Shaped corners a try sometime!
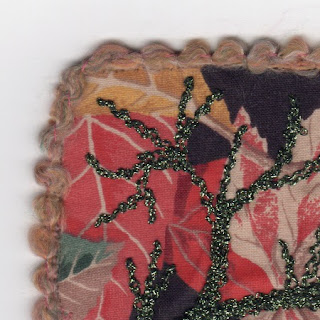
metallic piping corner

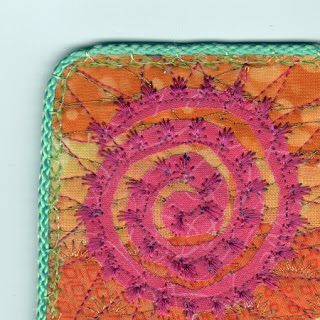
bobbin work with pearl cotton

yarn used in bobbin

more piping

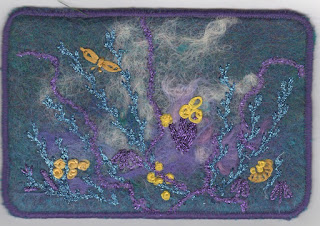
MaryLou Curry felted
MaryLou Curry metallic quilted

MaryLou Curry used wide satin stitch on edges

Sunday, December 6, 2015

Keep it Simple

December 2015
Sheree McKee
SewFabSew.blogspot.com

Some times you need to make a quick fabric postcard.  Time is of the essence.


Less can be effective and it can save time.  Keeping your postcard project short and sweet can lead to some nice results.

There is a marketing slogan called the KISS principle:  Keep it Simple and Straightforward.

This is a simple Christmas postcard.  By using a ribbon with text verse it adds to the holiday impact.


I used a sparkle background fabric;  a holly-themed cotton with hints of silver metallic specks.  It was fused to stabilizer.  I layered a “HO HO HO” ribbon near the bottom with decorative stitching.  I tucked in a little gather of tulle netting and a feather before sewing the top row.

Lastly, I pulled a small silk flower off a spare stem of white flowers in my craft closet, and topped it with a coordinated button!

The edges were finished with a metallic thread stitch.  Then I used Aleene’s Tacky glue along the edges only, to glue it to some postcard stock.
But first, I stamped the card stock with a rubberstamp.


It took me about two-and-a-half hours to make and finish four postcards!

A little sparkle, a little sentiment, and a little frou-frou!

Now it’s time to hang some Christmas decorations, bake some cookies, shop for gifts…. clean the house…. pack for a trip….  Whew!


Thursday, December 3, 2015

Merry Mittens in Ribbon

December 2015
Sheree McKee
sewfabsew.blogspot.com


Lace and ribbon scraps
These "Merry Mitten" fabric postcards are made from scrap ribbon and lace.


For this swap, I emphasized a Christmas theme by using a poinsettia background print.   You could create a snowy winter theme, by using ice blue and silver background fabrics.


Lay diagonally onto fusible side of stabilizer


First, I began by cutting a 6" wide by 24" long piece of single-sided stabilizer.  With the fusible glue facing upward, I laid random strips of ribbon at a 45 degree angle.  I pressed the ribbons into place in groups of three to four.  

Be careful not to touch the stabilizer with your hot iron!


Here's your chance to play with
decorative machine stitches
Secondly, once the strip of stabilizer was filled and fused,  I bridge stitched between each ribbon.  

I used a variety of decorative machine stitches and some variegated colored thread.  Metallic threads would also make pretty connecting stitches.


A mitten template can be moved around
Third, I drew up a mitten shaped pattern that would fit inside a final 4" x 6" postcard.  It was able to carefully cut four mittens from the stabilizer.  


Layer trims if needed


Then I layered some lace trims over a few of the wider ribbons.


Base postcards before mittens are attached

Next, I prepared four base postcards on more stabilizer.  This is where I used the pretty Poinsettia fabric from my stash as a background.


Finally, I centered the firm mitten shapes onto the bases.  I simply held them in place as I stitched the perimeter with a wide decorative stitch that would swing on and off the mitten.


You might like the link below to a previous blog article  


Saturday, November 7, 2015

New Finds on Fabric Postcards

November 2015
Sheree McKee
sewfabsew.blogspot.com


When I spend time cruising the internet instead of sewing, 
I find some interesting articles to share with you:
By Karen Cattoirre on Flickr
Blogs and Webs
Pinterest
Confetti postcard at http://www.boitascrap.com/
Swapping
Flickr
Videos
Darcy Wilkinson at PaperArtsy


You might enjoy this link to my past blog post on ~

Stabilize then cut apart vintage linens for postcards


Monday, October 26, 2015

All about Fabric Marking on Fiber Postcards

October 2015
Sheree McKee
sewfabsew.blogspot.com

Keep your specialty markers away from family markers 
or you might be disappointed when you really need them!

Eventually, you will need to address the back of your fiber postcards for correspondence and mailing. It's best to experiment with different marking methods as each type gives different results.


There are many marking options available, including permanent ink pens, gel pens, fabric markers, rubber stamp inks, inkjet transfer printing, inkjet direct printing and more.   There are also white inks suitable for dark fabrics, and metallic inks for special touches.


Nancie V. used three colors of marker pens on fine cotton

Metallic options
Both my never-used whites failed to  
write and appeared dried up!
Perhaps this color sits on the 
store shelf  too long with little demand


Since fabric postcards are never washed, you don't really have to worry about looking for permanent inks.  However, permanent ink might not fade as fast as traditional markers.

Most fabric postcards are also made with textile backs.  Some are created with card stock or different writeable surfaces.  These varying backs can affect the quality of handwritten or printed text.

Cardstock with pigment ink and rubberstamp
Yes, you can stitch 
through card stock 
I'll blog about that in the future!
Judy H. from Canada used 
muslin backing and Zig
Memory System marker
Lynn J. used pen on card stock and a cute red rubberstamp

Sometimes I run into trouble when using fabric markers for writing my postcards out.   This usually occurs when I attempt handwriting on rough fabric surfaces, but not on card stock or Tyvek postcard backs.

We've all spent time creating thoughtful fabric postcards to share with others, and it hurts when we spoil the backing.  Here's some insight I've discovered ~

CHALLENGES:
  1. Markers that blur, wick or run
  2. Pens that skip in the middle of writing text
  3. Dull ink without solid saturation or color
  4. Uneven surface due to texture in the postcard front face 

INKJOY test on fabric, I had to trace over twice 
on the orange and green. 
Not very saturated gel colors on fabric.

My Fav Sharpie Pen !

SOLUTIONS:
  1. Try handwriting on plain cotton fabric BEFORE it is fused to the back of postcard, because synthetic fusibles often wick through fabrics during ironing, causing resistance.
  2. Use high thread-count backing fabrics or microfibers for a smoother and a finer writing surface (See Denier details here)
  3. Be aware that some synthetic fibers often repel inks, use natural fibers such as cotton, rayon, silk
  4. Trace over text a second time (somewhat challenging)
  5. Write slowly and evenly
  6. Store your specialty pens away from family with tightly closed caps

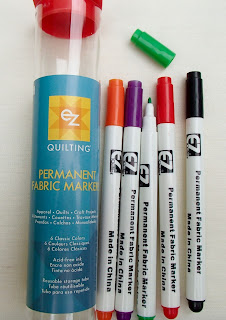
EZ QUILTING - Nice quality but chunky and thick results

MARVY ARTIST - Two tip sizes on each end are very helpful

SHARPIE - Fine Points come in many modern colors


TEST AHEAD OF TIME:
  1. Make samples of different inks on different surfaces to keep and review.  
  2. Be sure to label them for recalling which markers and methods are working.
SAKURA Pigma makes a variety of tips sizes and basic colors

PILOT roller balls come in several tip sizes


SAKURA permanent Identi-pens

I will cover inkjet printing and transfer in a future blog post, stay tuned.  You might like the link below to a previous blog article  
on using markers for art:


Thanks!  ShereeSews in M!ch!gan


~~~~~~~~~~~~~~~~~~~~~~~~~~~~~~~~~~~~~~~~~~~~~~~~~


HELPFUL WEB ARTICLES:

Compare Stamping Inks on Fabric by Craft Test Dummies

Writing on Fabric by Cheryl Lynch

Marking on Quilts by Sandra Hatch

How to Heat-Set Sakura Pigma at LoveBugStudios


ADDITIONAL RESOURCES:

Yasutomo FabricMate Superfine at Dharma Trading

Zig Fabricolor by Kuretake

Pilot - gel - roller ball - marker pens 

Sakura Identi and Pigma pens

EZ Quilting

Marvy Artist by Uchida

Sharpie

InkJoy by Papermate Facebook