Showing posts with label tutorial. Show all posts

Wednesday, January 30, 2019

Winter Theme Postcard Swap

January 2019
Sheree McKee

SewFabSew.blogspot.com


This swap with three other gals, was for an "Anything Winter" theme.  
I like landscapes, so here's some quick and basic instructions.
It's also easy to create two fabric postcards at a time.  


Begin with a 5" x 13" strip of SKY FABRIC and FUSIBLE STABILIZER - fuse together


Overlay a SNOW FABRIC with some hills and valleys - then fuse to SKY


This is a close up of the 5"x13' panel.
Machine stitch both the sky and the snow.  I used metallic thread on the snow.
If you use a white bobbin, the stitching is less likely to show through the final backing.


Layer some motifs like felt snowbanks, and some tree shapes or even animals (with fusible web on the backs ahead of time)
Outline stitch the snowbanks then decorative stitch the trees

It's time to trim with a rotary cutter, and create two 6" x 4 1/8" (regulation size) postcard shapes.


These metal stars are paper brads.  
Poke a large needle hole then push the brad prongs through and spread the prongs.  
But keep them away from postcard edge so your sewing machine foot will clear the metal stars when overcasting or binding your perimeter edges.

Finally, you will fuse a backing fabric on reverse side. 
This layer covers over your motif outline stitching and brads.
Keep it light in color, because you will address and write on this backing.
Complete outer edges as desired.


I had some felt Bucks and Bears in my stash of embellishments.  
They were glued on with Aleene's Tacky Glue as a final step.


Wednesday, January 21, 2015

Tea Tag Tutorial

Tea Tag for Valentines Day

Sheree McKee
January 2015
sewfabsew.blogspot.com


If you’ve successfully created a fabric postcard then 
making a “Tag” from my tutorial will be easy!

Ways you can use tags:
Embellishment on a gift
Identification for travel totes or luggage
Label a valuable item like your laptop computer, diaper bag etc.,
Tie it on a purse handle for a pop of whimsy!
As a hanging ornament or bookmark

In this tutorial, you will sew up a heart-shaped Tea Tag. 
The approximate finished size is just under 4”x6”.   
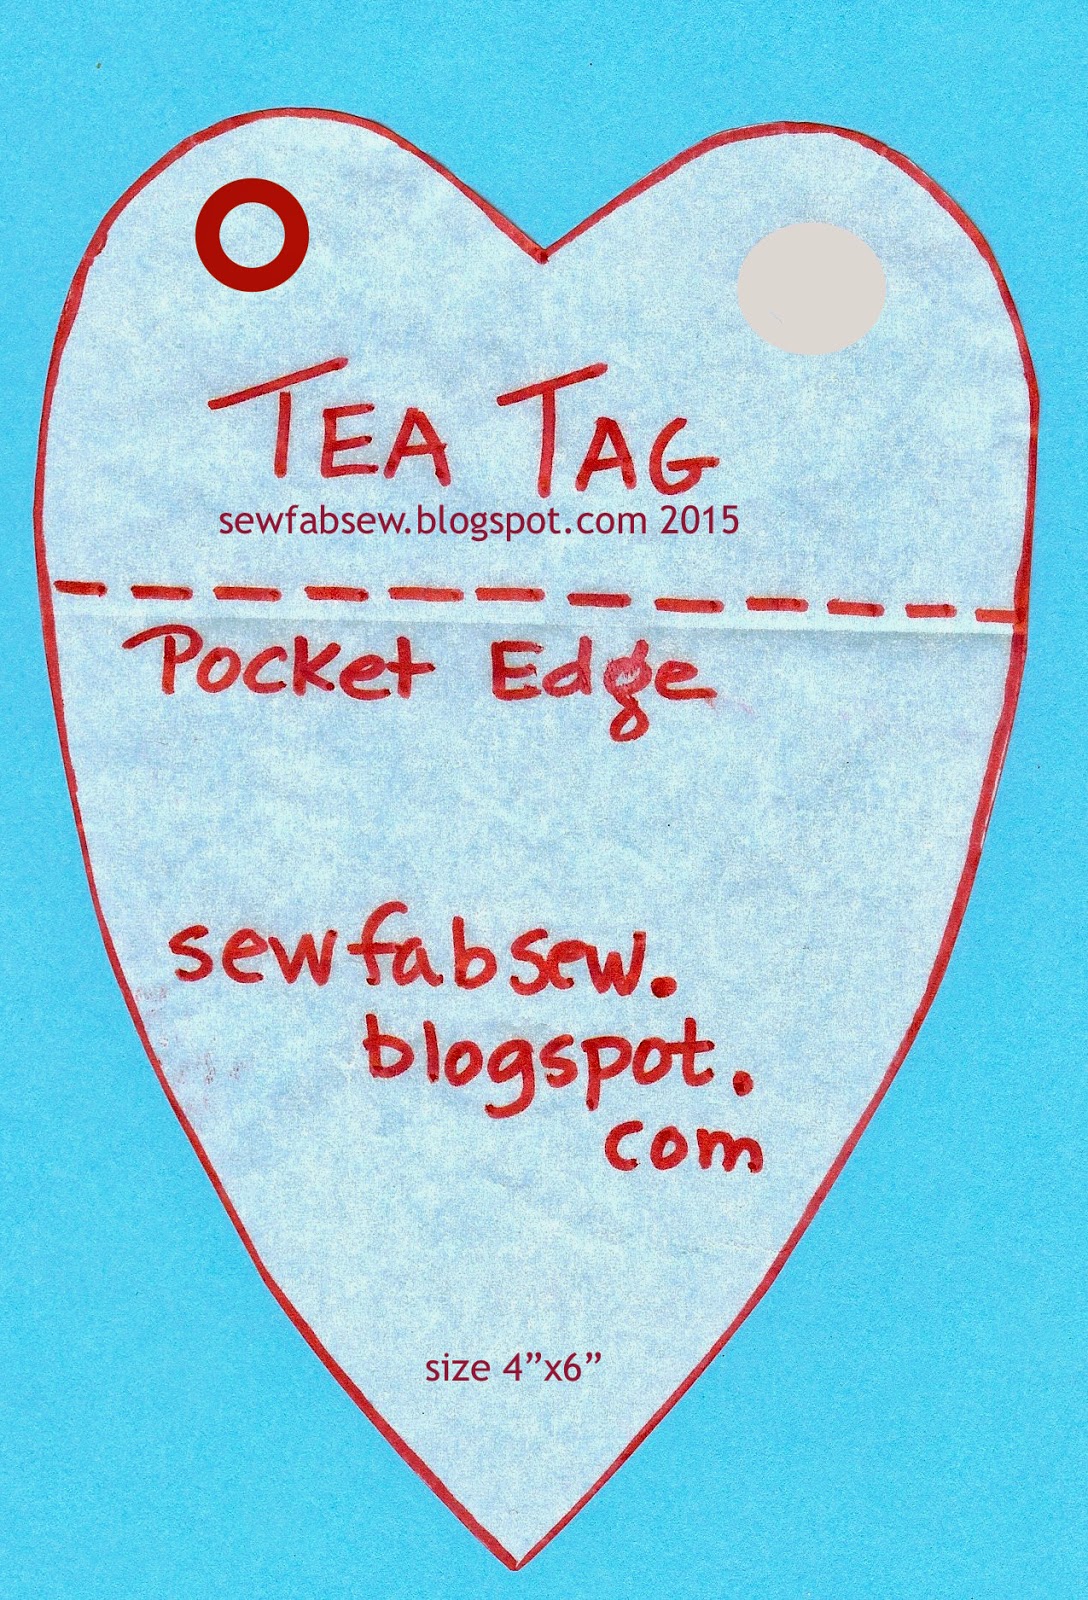
Begin by printing out the photo with a heart template below.


Template 4"x6"

Not only is the tag itself a useful accessory, but throw in a
few tea bags to make it a thoughtful and relaxing gift.

Gather together:
1-   Fusible Stiffener, approximate 4”x6” cut size
2-   Random fabric scraps to piece for front
3-   Fabric for back and pocket, 2 cuts 4”x6”
4-   Metal Grommet and tools… or you can substitute a buttonhole instead!
5-   Ribbons, cords, lace for tie
6-   Fusible web 4”x6”
7-   Optional pocket method:  Clear vinyl - cut larger than a business card
8-   Teflon foot or tear-away stabilizer used to sew over vinyl

Step One (front):
Piece and sew enough fabric strips and strings together,
to be larger than the template.
Press seams in one direction.
This is your heart front.  Fuse wrong sides to stiffener.
Arrange heart template diagonally across the front, pin and cut out.


Use up your scraps!

Now trimmed and fused to stiffener

Diagonal or Straight layout - your choice!


Step Two (back with pocket):
Cut 2” off the height of a single backing fabric. 
Double-fold down ½”, the top edge and topstitch two rows. 
This is your pocket top layer.
Lay pocket over the second fabric backing.  Align bottom and side edges.
Baste around four sides 1/8” from edges.


Two pieces needed to make pocket on back


Step Three:
With wrong sides together, align heart shaped front with pocket backing,
so pocket opening is about 1/3 from top.  Use fusible web between the  layers to bond together.  Cool then carefully trim heart shape a second time.  Double check to make sure pocket size can hold either a tea bag or a business card. 


Wrong sides together before fusing!


Step Four:
Finish outer edges with satin or decorative stitch of your choice.   Cut hole for grommet in upper corner, or stitch a 5/8” long buttonhole.  Tie on one or more ribbons!  Tuck a few colorful and tasteful tea bags in the pocket!


Grommet tools

Or cut a circle opening

Inserting grommet parts

Lace ties add a nice touch for Valentines Day


And here's a few luggage tags
made the same way!

Luggage tags with clear vinyl pocket

Luggage tag

Sunday, December 21, 2014

Fabric Postcard Tutorials and Lessons


Enjoy these Tutorials and Lessons online for 
creating Fabric Postcards

Sheree McKee
sewfabsew.blogspot.com

It's always fun to look at fabric postcard photos to get ideas for your next project. But how about some more in-depth lessons and tutorials?  

We can always learn from others with more experience.....


Annie's Musings

NeedledMom

Fabric Selvedge Postcard Tutorial by Anya

Carolyn's Quilts Tutorial

Lavendar Quilts - paper pieced postcard

Calidore postcard tutorial

Infectious Stitches

Color my World - Valentines

MaryQuilts.com - pdf

The Crafty Gemini with video

Quilty with video

Sue W Sews

Quilted Delights - Leah

Divine Caroline

Feathered Nest Studio - felt envelope and postcard

The Sewing Loft - Mod Podge postcards from fabric

Twelve Crafts till Christmas - no sew

Jo in New Zealand

Stitch by Stitch

Marelize

Red Shoe Ramblings

Kathy Briggs

Susan Dague Quilts

Lesley Langdon Creative - Stamped Postcard Video

Quilter in the Gap

Jans Little Bit Extra


No Sew Versions by 12 Crafts till Christmas

Printable Crafts Postcard

Sunday, March 2, 2014

Tutorial: Sew a Lucky 4 Leaf Clover

March 2014
Sheree McKee
sewfabsew.blogspot.com

This Lucky 4-leaf clover is 3" tall and can be used to embellish a fabric postcard.  But if you use one, plan on paying a little extra for specialty postage.   It can also be worn as a brooch, or used as a magnet.

I'm a new blogger, learning the ropes.  This is my first tutorial.  I hope to improve each day!

Thanks for visiting!     ShereeSews in Michigan

Use 3/4"  buttons to cover gathers at center


Finished size - 3" tall and 1/2" thick
Construction time - 20 minutes

    • Cut Four  - 3" squares of green cotton print fabric for leaves
    • Cut One   - 6" length of rattail cording or flat braid for stem
    • One   - button at least 3/4" diameter to cover middle gathers
    • Small bit of polyester fiberfill stuffing


    Supplies for Lucky 4-leaf Clover

    Four small poufs of fiberfil and a 3/4" button
    Rattail cording or Flat Braid

    Options:

    • Yo-Yo pre-made ( 1 1/4" fabric yo-yo for backing or additional large button)
    • Pin back or magnet if desired

      Supplies:

      • Sewing needle large-eyed, thread, beeswax

      Directions:

      1.  Seal raw ends of cording or braid by melting or glue dip.  Set aside to dry.


      2.  Prepare your threaded needle.  Cut a six foot length of thread.  Fold in half to make three foot.  Feed the fold into eye of needle then balance thread tails.  You now have four threads approximately 18" long.  

      3.  Strengthen thread by running through beeswax or soap several times.  This strength will prevent breakage when gathering all the leaves.

      4.  Fold a petal square on the diagonal.  Put a small ball of poly fiberfill into center fold.


        Finished side view of thickness with fiber fill


        5.  Run a 1/4" basting stitch along the two raw edges of triangle, pivoting at 90 degree corner.  Leave a 4" tail at start.  You will enclose the fiberfill inside this triangular leaf.


        6.  Gently gather the first leaf, shaping it into a slight cup shape.  Do not tie-off or cut threads!


        7.  Continue adding three more leaves onto your running thread by gathering each one and sliding them together.


        8.  Following the 4th leaf, run a stitch through both cord ends of stem, approximately 1/4" from the sealed raw edge.


        9.  Gather all leaves and stem together.  Close the circle using a double square knot to prevent slippage.  Gently re-shape the clover.


        10.  For a neat back, whip-stitch a pre-made yo-yo over center donut hole on back and
        sew a large button over the gathered circle on front side.


          2014 Sewing Fabric Postcards with ShereeSews


          sewfabsew.blogspot.com


          And Sew We Craft


          stitch by stitch