Sunday, December 31, 2017

Creative Envelope Swap


Handmade Envelopes

December 2017
Sheree McKee
SewFabSew.blogspot.com


Made by Sheree McKee - my ten creations
I joined a unique swap, this past fall, that was recommended by a swapping friend, Sue Balchak, Admin of the PostCardMailArt group on Yahoo. 

This involved creating your own envelopes or embellishing pre-made ones.  I didn't know what to expect, since I hadn't seen any examples beforehand.

There was no limit to sizes and shapes.  Send in ten, and receive ten.  Some type of surface embellishment was required.  The envelopes were not related or intended for fabric postcards.

I drafted a rounded template shape that I was fond of.  But it had to fit on an old calendar I'd been holding onto.  This calendar was full of colorful Kaleidoscope images that I enjoyed.  I'm glad I saved it since 2007.


I glued shut the flaps but covered intersection with a sticker
The sentiment "Just Because" seemed like a nice addition.
If you look closely, I signed each envelope on the interior calendar.


I added a label for addressing

Embossed with metallic touches


The ten colorful envelopes I submitted made it worth saving that calendar for ten years!


And here's what I received in return!  A large manila sized envelope full of Wonderful SURPRISES!!  Next time I will keep better records of each contributor.  Their unique workmanship was thoughtful and amazing!  Sadly, many did not contain signatures or information on their creators.  Each participant contributed $5 for return postage... I would definitely play along again.

#1 and #2 Manilla Envelopes Front

#1 and #2 Manilla Envelopes Back

#3 and #4 Fronts

#3 and #4 Backs

#5 and #6 Fronts

#5 and #6 Backs


#7 and #8 Fronts

#7 and #8 Backs


#9 and #10 Fronts

#9 and #10 Backs


Friday, December 22, 2017

Winter Mittens in 12 Steps

Winter Mittens in 12 Steps
December 2017
Sheree McKee
sewfabsew.blogspot.com


Winter mittens are a pretty easy postcard project.  There's a lot of opportunity for customization to make them unique.  These mittens are made using an easy facing-technique rather than a single layer. They were also mailed in traditional envelopes.  Email a photo of your mitten version and I will post it here, along with your name and state!  sewfabsew@aol.com


  1. Draw a mitten shape on paper to fit within a 4"x6" postcard size then Trace it on a muslin or lining fabric
  2. Select a mitten fabric, I chose a metallic chevron cotton from a remnant
  3. Right sides together, pin the two fabrics then sew using a scant 1/8th inch seam but leave the bottom wrist area open for turning.  Also use a close stitch length.
  4. Trim the shape closely, using pinking shears and snip into deep thumb area
  5. Press mitten shape lightly
  6. Prepare a postcard front base.  I fused a holiday candy fabric onto a long piece of fusible stabilizer
  7. Trim postcard to 4 1/4" by 6" size
  8. Pin mitten to postcard base.  I skewed my mitten layout in different directions for interest
  9. Use a favorite machine stitch to appliqué the mitten in place.  Experiment ahead of time because some overcast stitches do not work well on sharp curves.  You can leave the wrist open if you want to add a small amount of stuffing to make your mitten puffy!
  10. Then I added and fused my backing fabric to each postcard, knowing the cuff would have dimension and be difficult to fuse once it was applied.  I perimeter stitched the edges.
  11. Finally a remnant of real fur was cut into a simple cuff shape, but you could use synthetic sherpa, feather boa, or wool batting.  This was centered and glued over the open wrist area of mitten.
  12. Embellish as desired.  I glued a metal tag and ribbon loop.  If you notice, I tried a different spot for each one.  I get very bored making everything the same.
#1

#2

#3
#4
#5
#6
#7 #8
#9
#9 Back
#11 #12


~ ~ ~ ~ ~ ~ ~ ~ ~ ~ ~ ~ ~ 

My Merry Mittens in Ribbon is another post you might enjoy!

or

 Cute Camper themed postcards


Sunday, August 20, 2017

Four Neckties make One Postcard

May 2017
Sheree McKee


Neckties Recycled


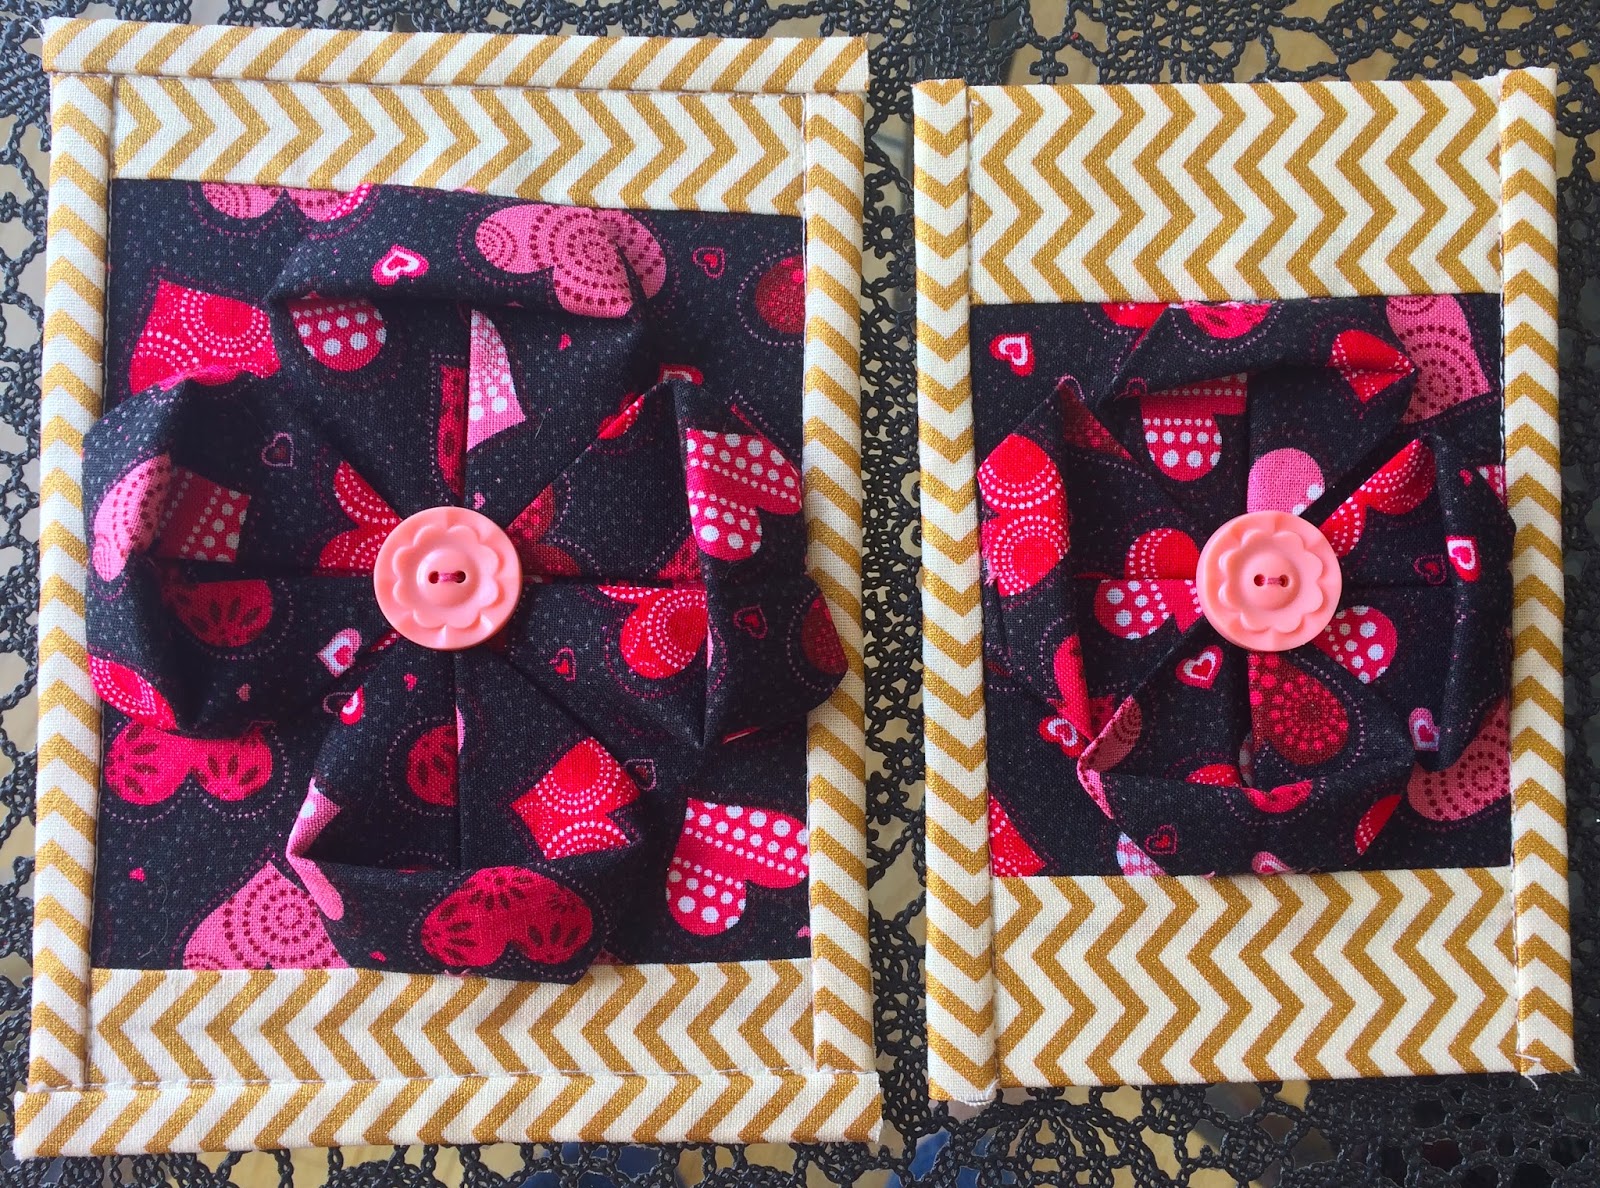
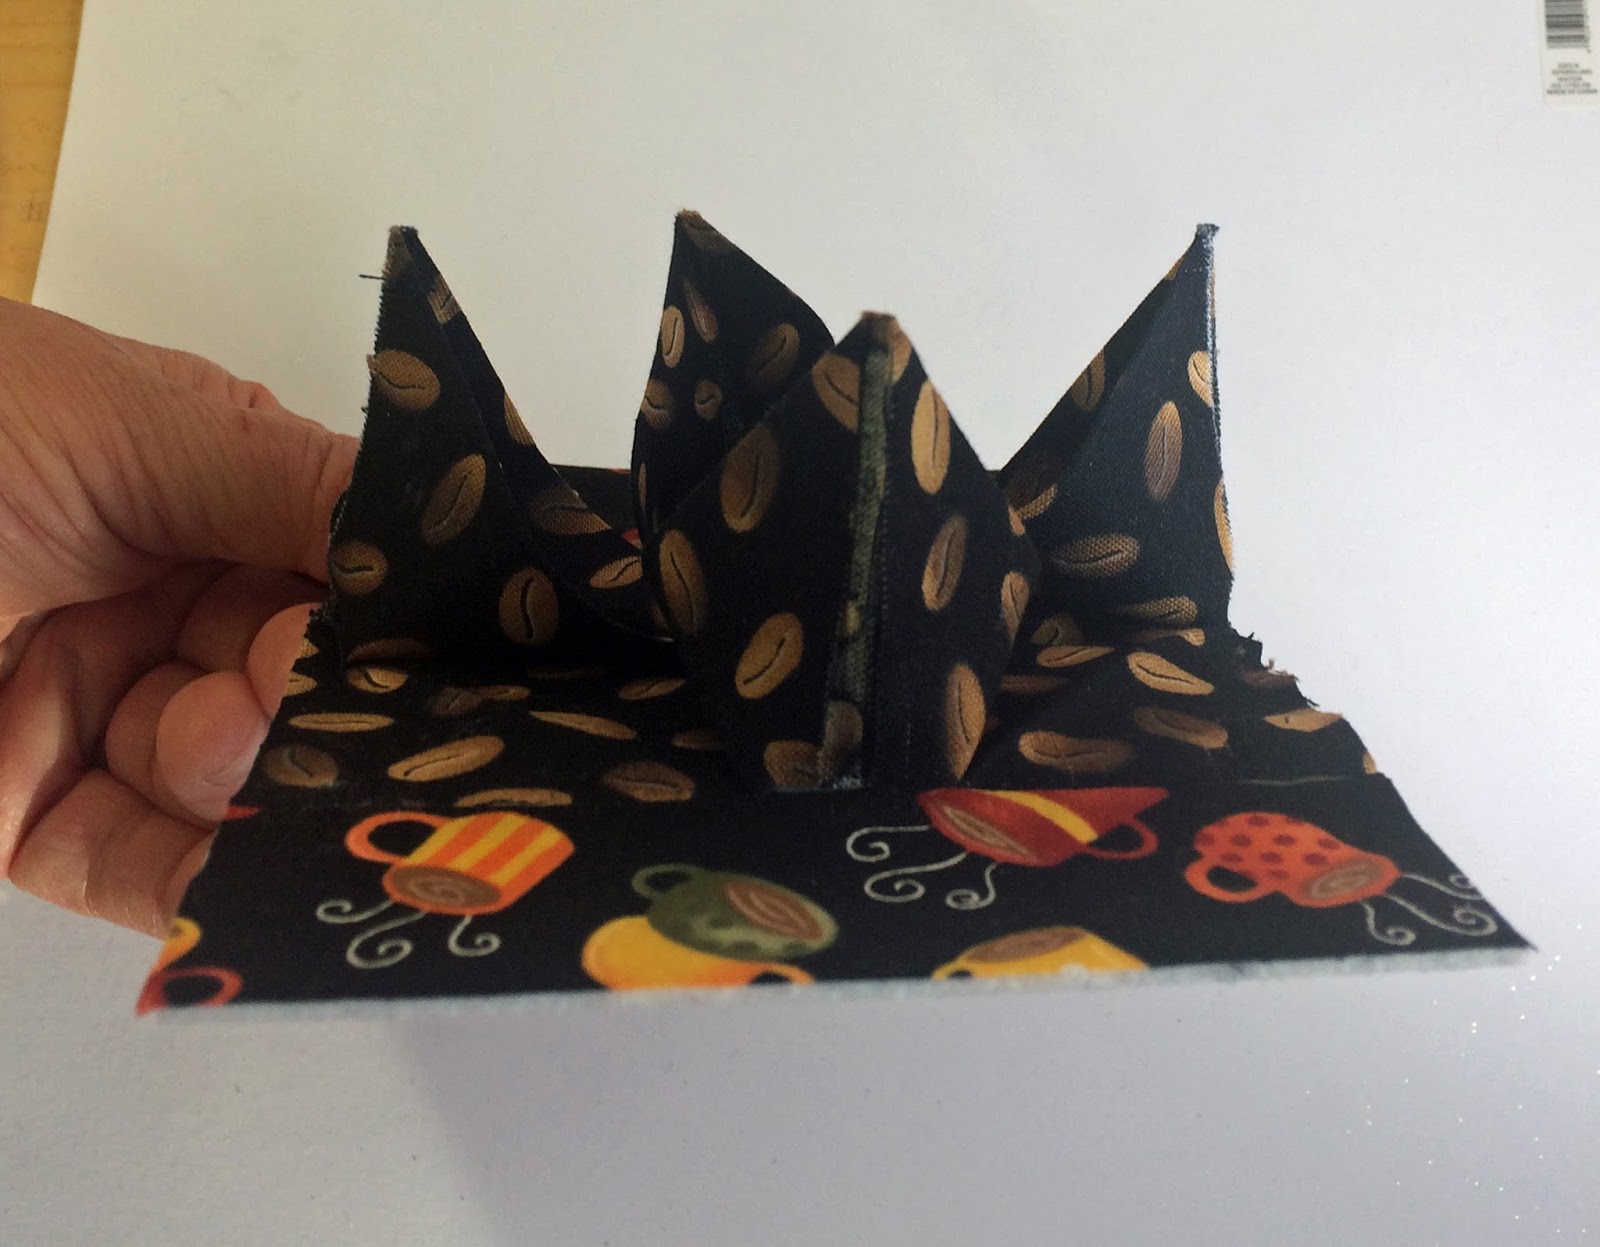
This swap challenge with my friends at PostCardMailArt (Yahoo Group) was called "Tie Techniques".  The object was to use up old neckties in a postcard project, but not neccessarily keeping them in a necktie "shape.

Each postcard took 4 different deconstructed neckties.

I've been collecting silk neckties for a long time.  Goodwill and garage sales are my main sources.  Many girlfriends would just give me handfulls of toss-out ties.  However, a lot of those were polyester.  But the silk ties... now those are true treasures!  I've made pillows from them, small purses, Kansashi flower pins and more. I've also used silk ties to bind raw seam allowances inside hand made garments.


Sometimes old neckties stink!


Cigars, smoke, pets, mildew and food odors can linger on fibers.  I spritz a group of neckties lightly with Febreeze Fabric spray, then toss them into my dryer on low heat with a damp towel.  Often, I need to repeat a second time.


Sometimes old neckties are stained!


I sort the polyesters and pre-treat obvious stains.  Then I wash the poly ties in warm water, on a gentle cycle with detergent and an Oxy type laundry additive.  Tumble on low heat with an added towel.


I do not machine wash silk ties.  I tried it, but they ended up distorted, twisted, and in a tangled mess.  Instead, I now use a white cloth, and laundry spot cleaner just on the greasy or stained areas.  Daub gently, so you can avoid abrading the silk textures.


Sometimes old neckties are ugly!

Embrace it... sort by color families... even the ugliest guy in the bunch looks better when surrounded by a few cute friends.  

I like to sort my tie collection into little groups of three-four coordinating families.  I roll them into coordinated jelly-roll shapes and store them stacked inside a clear plastic bin.   

Don't leave silk neckties in wads in a box or bag!  I made this mistake years ago.  Purchased some, then threw the bag in bottom of a closet for a few years.  You will have a wrinkled and distorted mess that is difficult to get the shapes back.  Natural silk, needs lots of steam to press out the wrinkles!


Save the Guts and Labels!

The natural wool interlining can be used as snow in your landscape postcards.  It can also be used to create sleeve headers if you are a garment seamstress.  I've even used the long sections of interlining as "rope" to tie folded fabric bundles together, for storage.

Labels are interesting and worth collecting.  Sometimes they are designer names which make them more valuable.  Unique labels can add cute pops of color or interest in other sewing projects.

Helpful Necktie Websites

~ ~ ~ ~ ~ ~ ~ ~ ~ ~

More of my blog entries you might like:


SaveSaveSaveSave

Tuesday, March 7, 2017

Sewing Green

March 7, 2017
Sheree McKee

sewfabsew.blogspot.com


Display fabric postcards


🍀 Green Green Green... the color is fresh and cheerful.  It's also the welcoming spring hue of St. Patricks day.

I like to display my collection of swapped fabric postcards (FPC) during holidays.  They have replaced traditional holiday decorations in my kitchen.


Display fabric postcards

🍀March in Michigan still feels like winter without any leaves on the trees plus cold weather

This window has a north exposure.  Since the postcard backs face outward, and they only display for about 10 days, I really don't worry about any fading from sunlight.


Display fabric postcards

🍀 One of my favorite holidays is St. Patricks Day.  I try to join postcard swaps during this time of year, just to increase my collection of Green fiber postcards!


sewfabsew.blogspot.com

💚Recently, I completed these green postcards for an upcoming March swap.

They are dimensional pinwheels, inspired from a blog by Teresa Down Under called Sewn Up: 41 Fabric Manipulations

If you look closely, you will see a gemstone on each one.

Here is the link to Origami Pinwheels by Teresa Block #22


prairie points at sewfabsew.blogspot.com

💚 This postcard contains 5 different prairie points.  It was an impromptu throw-together, without any planning.  Just a sew as-you-go project.  But I am happy with the results.


Threads for couching and bobbin-work

Speaking of green, let's talk about a few "green things" you might want to try on your postcard projects.

Knit-Cro-Sheen by JP Coats works nicely for "Couching" and "BobbinWork" techniques.  It is a size 10, cotton crochet thread that comes in solid or variegated colors.

This multi-tonal green has many uses and is one of my favorites to work with.

Pearl Cotton by DMC is another great alternative with a beautiful pearl finish.


COUCHING:

I have zig-zagged over stands of crochet thread to add surface texture on past fabric postcards.   I've also couched several strands at a time, using a specialty presser foot, along the outer edges of my postcards. This makes a unique looking edge.

BOBBIN-WORK:
  1. While these threads are too thick to use in a machine needle, you can hand-wrap a bobbin with them.  
  2. Then loosen your bobbin case screw to allow an easy thread flow.  
  3. Now you can stitch on the wrong side of your project to create some "Bobbin-Work" techniques.  
  4. With bobbin-work it's best to use airy, loose-style decorative stitches to prevent knotting.  
  5. Select a longer stitch length and a tighter top tension to draw the heavy threads upward .  
  6. Test a stitch sample to get the feel and look you want, for best results.


Trim for embellishment


RICK RACK:

Or spelled Ric-Rac, is a craft braid trim that's flat, usually polyester and used for sewing and crafting.  This trim comes pre-packaged or by-the-yard.  It can add a whimsical addition to your FPC.  Some crafters and seamstresses prefer the vintage cotton versions when working with vintage fabrics.


COMMON RIC RAC SIZING:
  •   Baby 1/4" width
  •   Medium 1/2" width
  •   Jumbo 5/8" width

HELPFUL and FUN BLOGS:

Attached to Rick Rack Blog

How to Sew with Rick Rack: The Most Terrific of Trims

How to Sew RickRack to your Quilt like an Expert

Fusing Rickrack Tutorial


https://www.etsy.com/shop/MakinPretty23
www.etsy.com/shop/MakinPretty23


BUTTONS:

Buttons and flat embellishments are the perfect compliment to a fiber postcard.  But their thickness can add to the cost of shipping if your envelope is more than 1/8" in thickness.  

When I create highly embellished postcards, I usually ship them inside envelopes to protect the surface.  Sometimes I add a single layer of bubble wrap over top. And I automatically plan on using two-ounce postage rates.


Fine pewter buttons made by treasurecast.com
Celtic Sisters Knot


Heart celtic buttons by treasurecast.com
treasurecast.com


CELTIC PEWTER BUTTONS:

Here are some beautiful Celtic Buttons created in fine pewter by Treasure Cast of Boise, Idaho.  

These USA made, pewter buttons have shanks to either sew on, or clip the shanks off with a wire cutter and glue the buttons in place with some E-6000 adhesive.


A handmade, St. Patricks Day postcard would make a nice surprise to send to your friends!


Pull out all your green fabrics and notions to stitch up your creation!


~ ~ ~ ~ ~ ~ ~ ~ ~ ~ ~ ~ ~ ~ ~ ~ ~ 


Past Blog Posts that you might enjoy!

Irish Postcards

Marker Art


SaveSave

Sunday, February 26, 2017

Surface Dimension for your Fiber Postcards


February 2017
Sheree McKee
sewfabsew.blogspot.com


Do you appreciate texture and dimension in your textile projects?  I do, and I often think about methods to add surface design to my postcard creations.  These Fabric Postcards (FPC) were fun to make using an Origami technique for folding and manipulating cotton fabric into flowers.

Image 1 Valentine Purple
Petals are in 12-3-6-9 o'clock positions
and flattened then secured into the  binding seams.
Folded Flower block was set at top half of postcard
allowing a bottom black band


Image 2 Coffee Canisters
Petals were left free in this example

While the construction looks like four individual flower petals, similar to Kanshashi.... they aren't.  Instead, I used a single 9" square of fabric folded down to create the flower medallion.  These are constructed into the fabric postcard, not simply added on top.

My inspiration came from a blog called Sewn Up by TeresaDownUnder.  She has a tutorial section on her blog called "41 Fabric Manipulations" and it is enjoyable!  Her site is full of dimensional quilt blocks and tutorials on folding, pressing and stitching methods.  I used her Block #20: Origami Flower.

I don't want to re-invent the wheel so I suggest you review and practice by watching her tutorial video a couple times.  Then come back for methods to turn your Origami flower into a FPC.  Here is the helpful You-Tube Video on Block #20 by Teresa.

TeresaDownUnder starts with a 10.5" fabric square in her tutorial, but it is too large for our postcards.  After testing, I eventually reduced my starting fabric square down to 8 1/2" for the sake of fitting onto a standard 4"x6" postcard.  However, I suggest that you learn the technique, by starting with a folded sample made from the demonstrated 10.5" size.  Perfect it first, then move down to the more challenging 8 1/2" fabric square.


Image 3
Left is made from 10.5" starting fabric square which yields a 5x7" postcard
Right is made from a 9" starting fabric square which yields a 4 1/4" x 6 1/4" postcard
These petals were rolled under and stitched to secure in place
Image 4 - Side profile shows dimension


Several different flower petal styles depend on whether you: 
  • Leave the petal edges free  (see Image 2)
  • Roll the petals under and secure stitch  (see Image 6)
  • Flatten and secure into edge bindings  (see Image 1)

Rotate the folded Origami square so the petals lay either:
  • Square to the postcard edges (see Image 1)
  • Diagonal to the poscard edges (see Image 5)

Image 5 Valentine Red
Petals in the 1-5-7-11 o'clock position by rotating the
flower block and the petal tips are kept free.
Flower block centered on FPC with two rows
of grosgrain ribbon on each side of it


Image 6 Valentine Black
I rolled each petal edge under then secure stitched in place

Changes I made that differ from the video:
  • I reduced starting fabric square to 8.5" in order to yield a 4"x6" finished size
  • I fused tiny pieces of webbing inside each petal point (see image 6)
  • Sometimes I tear my squares to keep on grain, but you could use a rotary cutter

Image 7
Fuse down eight points with small
amount of fusible webbing to secure points

Construction Steps:

1. Press and make a folded flower from 8 1/2" fabric square
2. Fuse webbing inside eight petal points (4 points x 2 sides)
3. Open flaps and secure middle of flower with a sewn button
Step 1

4. Cut a 4 x 6 piece of stiff stabilizer - I use Peltex 70
5. Decide where you want your flower located on stabilizer (centered vs. top or bottom)
6. Pin it in place

Step 4 testing a square layout
Step 4 alternate diagonal layout

7. Sew flat grosgrain ribbon to hold flower in place on the stabilizer or
8. Stitch and flip coordinating fabrics to secure it to the stabilizer

Step 8 diagonal setting


Step 8 squared setting

Step 8 squared setting with flower at top position of postcard

9. Trim excess fabrics then topstitch around perimeter


Step 9 trimmed to 4"x6" before topstitching perimeter
Keep petals out of the way


10. Prepare a postcard backing and fuse it backside


Step 10

11. Decide an edging method (satin stitch, decorative stitch, binding)

Decorative Stitched Edge

Partial Binding

12. Gently shape flower petals by pushing petal upward and tips downward


Image 8
For a Coffee Themed Swap
at PostcardMailArt on Yahoo Groups
Image 9
For a Coffee Themed Swap
at PCMA


~ ~ ~ ~ ~ ~ ~ ~ ~ ~ ~ ~
Thanks for stopping by!


Another of my Blog Posts you might enjoy:

Writing on the back of your Fabric Postcards