Wednesday, January 21, 2015

Tea Tag Tutorial

Tea Tag for Valentines Day

Sheree McKee
January 2015
sewfabsew.blogspot.com


If you’ve successfully created a fabric postcard then 
making a “Tag” from my tutorial will be easy!

Ways you can use tags:
Embellishment on a gift
Identification for travel totes or luggage
Label a valuable item like your laptop computer, diaper bag etc.,
Tie it on a purse handle for a pop of whimsy!
As a hanging ornament or bookmark

In this tutorial, you will sew up a heart-shaped Tea Tag. 
The approximate finished size is just under 4”x6”.   
Begin by printing out the photo with a heart template below.
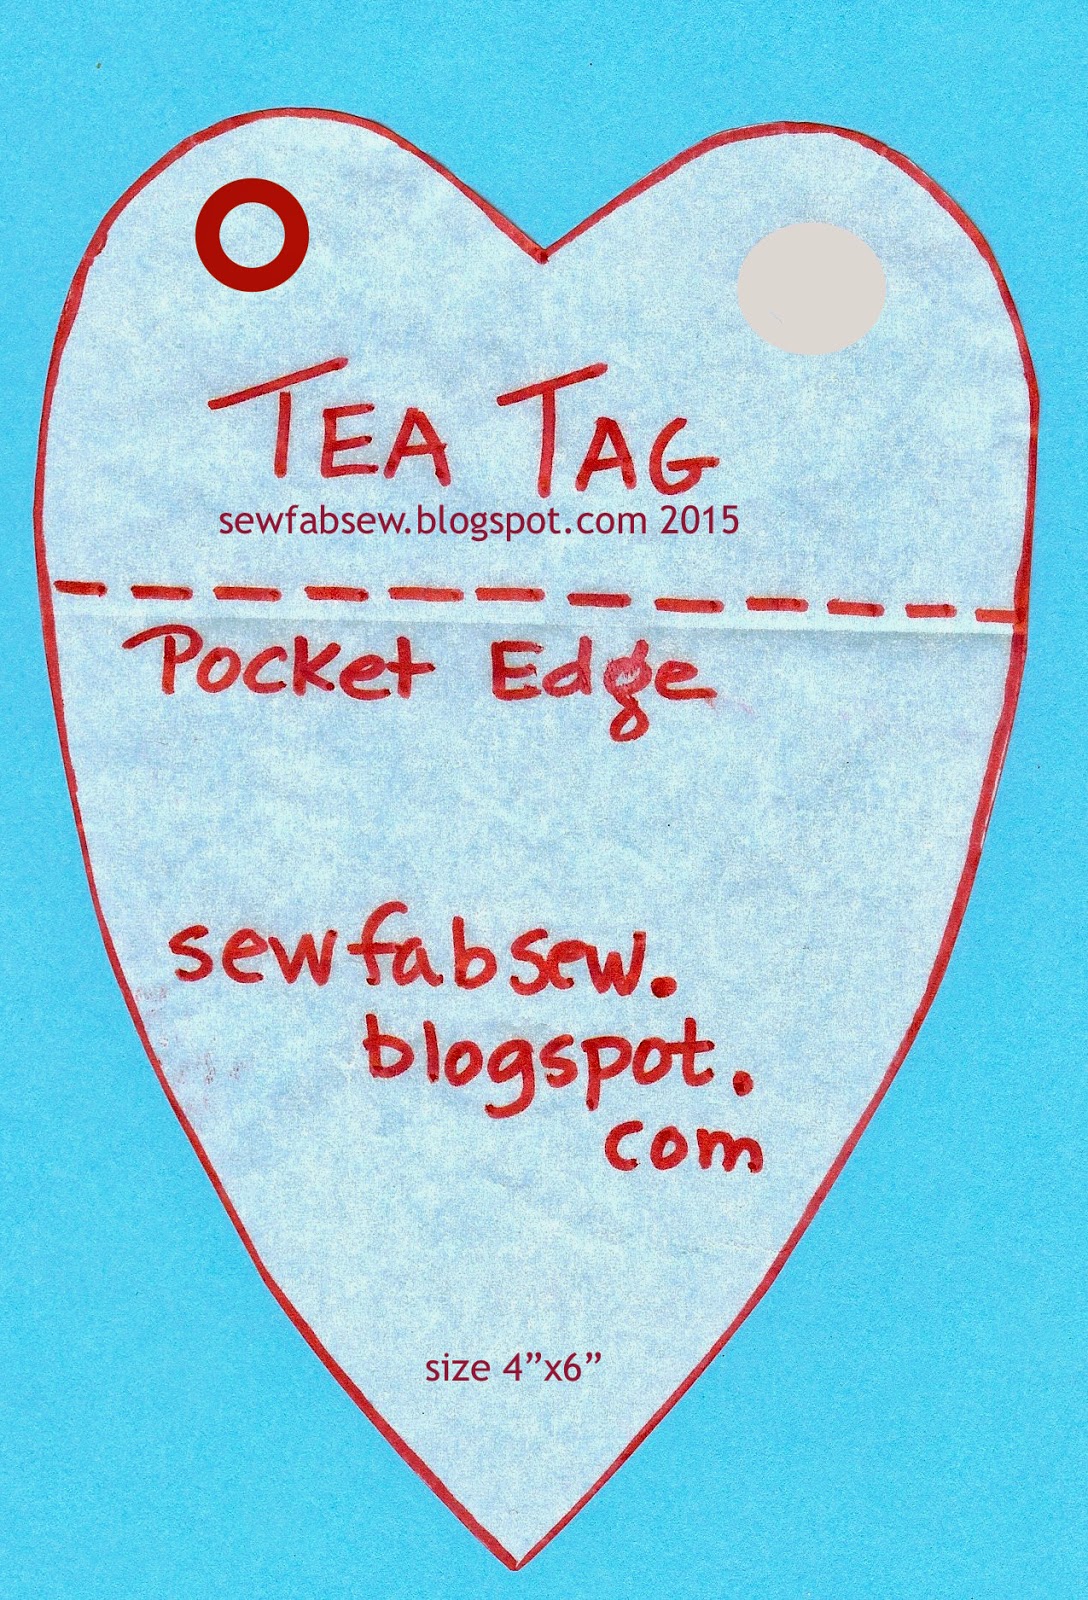

Template 4"x6"

Not only is the tag itself a useful accessory, but throw in a
few tea bags to make it a thoughtful and relaxing gift.

Gather together:
1-   Fusible Stiffener, approximate 4”x6” cut size
2-   Random fabric scraps to piece for front
3-   Fabric for back and pocket, 2 cuts 4”x6”
4-   Metal Grommet and tools… or you can substitute a buttonhole instead!
5-   Ribbons, cords, lace for tie
6-   Fusible web 4”x6”
7-   Optional pocket method:  Clear vinyl - cut larger than a business card
8-   Teflon foot or tear-away stabilizer used to sew over vinyl

Step One (front):
Piece and sew enough fabric strips and strings together,
to be larger than the template.
Press seams in one direction.
This is your heart front.  Fuse wrong sides to stiffener.
Arrange heart template diagonally across the front, pin and cut out.


Use up your scraps!

Now trimmed and fused to stiffener

Diagonal or Straight layout - your choice!


Step Two (back with pocket):
Cut 2” off the height of a single backing fabric. 
Double-fold down ½”, the top edge and topstitch two rows. 
This is your pocket top layer.
Lay pocket over the second fabric backing.  Align bottom and side edges.
Baste around four sides 1/8” from edges.


Two pieces needed to make pocket on back


Step Three:
With wrong sides together, align heart shaped front with pocket backing,
so pocket opening is about 1/3 from top.  Use fusible web between the  layers to bond together.  Cool then carefully trim heart shape a second time.  Double check to make sure pocket size can hold either a tea bag or a business card. 


Wrong sides together before fusing!


Step Four:
Finish outer edges with satin or decorative stitch of your choice.   Cut hole for grommet in upper corner, or stitch a 5/8” long buttonhole.  Tie on one or more ribbons!  Tuck a few colorful and tasteful tea bags in the pocket!


Grommet tools

Or cut a circle opening

Inserting grommet parts

Lace ties add a nice touch for Valentines Day


And here's a few luggage tags
made the same way!

Luggage tags with clear vinyl pocket

Luggage tag

Monday, January 5, 2015

Holiday Recycling

Holiday Recycling for winter fun!

Sheree McKee
sewfabsew.blogspot.com
January 2015


With the holidays past us, sometimes we need a winter project to fill the time until spring.  Christmas probably offers the biggest selection of cool textural "stuff" to revamp.  

Just what do you plan to recycle?  There is an unlimited possibility when your imagination is revved up!   This could be your chance to turn some trash into treasure…. or NOT!
Woven background uses coffee bags

Have you found yourself saving any of the items listed below?

Holiday advertising mail or catalogs
Baubles, Beads, Buttons
Broken ornaments or jewelry
Candle waxes
Candy wrappers
Christmas Cards
Foils: Coffee or Cookie bags
Holiday napkins
Holiday Stickers
Pinecones
Postal Stamps
Ribbon or cording
Silk flowers
Tapes: Duct, Washi etc.,
Tinsel or Trim
Tissue or Wrapping paper
Wine corks
Stuff to recycle
Colorful coffee bags
Since fiber postcards are the subject of this blog, most items will need to be flattened or cut into smaller sizes.  Keep in mind, the more dimensional your postcard surface is... the more postage and special handling it will require.

You will also want to incorporate some amount of fabric or textile to keep with the theme of “fiber postcards”.  

This year, I decided to re-purpose colorful coffee bags, they are much too pretty to toss out!  My thoughts were geared towards weaving the metallic strips of bag together with fabric and leftover ribbon or cords to form a base fabric.

I’m not too happy with the end results.... and I'll share why.  But at least I gave it a try.  The coffee bags appeared to be foil-like.  In my first attempt, I cut random width strips and left the top edge intact.  On a tabletop, I taped down the upper edge then flat-wove other items through the metallic strips.  The results were a simple 13"x13" fiber weaving.  


In my first version, I cut sides open to lay flat
I used scallop rotary cutter and left top edge intact
But those bags had a mind of their own!  They had curves and folds from being shaped like a coffee bag.  My brain said "Let's iron my new woven fabric flat."  I used a non-stick pressing sheet for protection.  Unfortunately, I discovered the coffee bags were made of 
a heat-sensitive thermoplastic, not a foil at all.  The strips twisted and torqued every which-way and all the woven ribbons, fabric, etc., popped out.  I was forced to reweave, then chose to lightly fuse an iron-on interfacing to the back to hold everything together.
Interfacing on back


Woven but distorted

The second attempt was more successful.   This time I used a straight rotary blade and cut complete strips from the coffee bag.  Then I used duct tape to secure the top edge and used clear packing tape on the backs after weaving a few rows. 

My second coffee bag
Eventually, it was time to stitch through the layers and hold everything together.  My first version was easy to stitch because it had an interfacing backing.  My second attempt was more challenging due to clear packing tape adhering the back together.  This tape gummed up my needle a few times, and resulted in a some skipped stitches.


Decorative stitching to hold the weave together


Finally it was time to cut apart my mini masterpieces (joke).  Below, you can see a window template (made from cardstock) that I use to audition the best cutting location for postcards.   After careful planning, I was able to get two postcards from each woven coffee bag.


I must admit, this was a lot of work to produce a background fabric.  Many times my ideas don't quite work the way I plan!  

The start of four postcards
In the first photos, you can see I chose to sew a fabric yo-yo and holly leaf on my project.  But another idea I plan to play around with will use sparkly motifs cut from Christmas cards. I'll keep you updated with additions to this article.  Have fun with your recycling and designing!

Sparkly embellishment designs from fronts of holiday cards
Here is the backside with fabric backing and iron-on binding